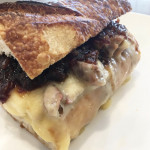
(you could definitely use a from scratch vodka sauce recipe, but this brand is SO good if you just doctor it up a little 🙂
For Lasagna
9 Lasagna Noodles, cooked per the directions and tossed in evoo below.
1T EVOO
2 C ricotta cheese
2 C Mozzarella cheese
5 leaves Basil, sliced THIN
1 t Fresh cracked Pepper
1/2 t Salt
Instructions
* Preheat smoker to (350F)
1. Brown the meat in a large saute pan. Remove the meat from the pan and drain. Add the onions to the same pan and cook over medium high heat until transparent and fragrant. Add the Garlic and saute and additional 2-3 minutes.
2. Combine the vodka sauce, sugar, and meat back into the saute pan and stir over medium heat until heated through. Set aside.
3. In a separate bowl combine the ricotta, half of the Mozzarella, basil, and S&P.
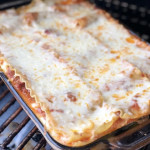
4. In a 9×13 Pan ladle a small amount of vodka sauce around the base. Place 3 Lasagna noodles on the bottom and cover with 1/2 of the ricotta mix, then 1/3 of the meat mix. Repeat steps until you’ve topped the pan with the final 3 noodles. Cover the noodles in the final 3rd of Vodka sauce and sprinkle with the remaining Mozzarella.
5. Cover the pan loosely in foil place in the center of the grill. Cook covered for 45 minutes, removed foil and cook for an additional 15 minutes until the top is bubbling and browned sightly.
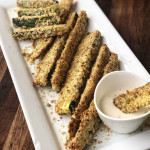
Cut the ends off of the zucchini then cut each one into strips. You should get about 6 strips per.
Place the zucchini strips into a large zip top bag and add the flour. Shake the bag to coat the zucchini. Set aside. Combine the panko bread crumbs, pistachios, and Traeger rub and stir to combine. place on a large paper plate or shallow dish.
Whisk the egg and water together until smooth and place in a second shallow dish
Preheat grill to 425F. While grill heats, dip each zucchini slice into the egg mixture (one at a time) then the seasoned bread crumb mixture. Place the breaded zucchini on a wire cooling rack until they’re all completed.
Once all of the zucchini strips are breaded, place each one directly on preheated grill grates and smoke for approximately 20 minutes or until golden brown. Serve hot with ranch!
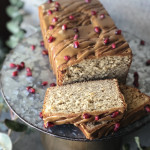
Christmas is begging for this banana bread! Super moist and super dense, it really is fantastic. You could easily add chocolate chips, but honestly I think its great without them! (and that is saying a lot!)
Scale
Ingredients
1 3/4 Cup Flour
3/4 Teaspoon Baking Soda
1 1/4 t Cream of Tartar
1/2 t Flake Salt
1/3 C Shortening
1/3 C Cookie Butter
1/2 C Cream cheese, softened
2/3 C Sugar
2 Eggs
1 C Mashed Bananas, about 2 med-large bananas.
Optional: (additional cookie butter for melting and pom seeds for decor)
Instructions
Preheat grill to 350
Cream together the shortening, cookie butter, cream cheese, eggs and sugar in the bowl of a standing mixer.
Combine the dry ingredients and add alternately with the bananas to the creamed mixture.
Stir until just combined
Bake in the center of the grill (or oven) for 1 hour. (tent with foil if its getting too brown)
Let cool completely and drizzle with melted cookie butter and pom seeds.
Notes
Recipe adapted from oh sweet basil!
Share
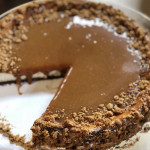
Vanilla bean Cheesecake with Gingersnap Crust and Butterscotch Glaze
Mix all ingredients (minus the butterscotch) in an electric mixer until there are no lumps
Pour the cream cheese mixture over the prepared Gingersnap cookie crust in a 9in Spring form Pan.
Cook for 1 hour. Let fully set in the refrigerator for a minimum of an additional 3-4 hours. If you can, keep it in the refrigerator overnight before serving.
Top with 3/4 C Butterscotch Topping (Store bought or home-made)
Crust:
In a medium sized bowl combine all ingredients until fully incorporated.
Cover the bottom of a 9in spring form pan in parchment and spray the sides in cooking spray.
Press the crust into the bottom of the pan. (The base of a measuring cup works great) Fill with prepared cheesecake.
This recipe will 100% be your new favorite Thanksgiving Turkey. I guarantee that it has more flavor than any other turkey you’ve ever had. With white wine, honey, butter, rub, grape juice, thyme, sage, and a myriad of aromatic vegetables it will be both a crowd pleaser and gorgeous centerpiece to your Thanksgiving table. Not to mention it cooks in just THREE hours. No more basting and heating up your house. Throw it in the smoker, check it in 2.5 hours, and eat the best turkey of your life. I made this recipe 6 times over the course of 2 weeks to perfect it. I don’t regret a single bite, and cant wait to make it again. That’s how good it is.
I was also able to partner with Harmons Grocery to create a full how-to video for this recipe. I would definitely recommend watching it before starting to get a good idea of how everything should look, how to spatchcock, and how to do injections properly. I know it can all sound intimidating, but I promise its so incredibly easy.
If you’re local to Utah, you can also click HERE to get the recipe from Harmons.com as well as create a grocery list for everything you’ll need
Scale
Ingredients
For Turkey
1 12-15Lb Turkey
1 Bundle fresh Thyme leaves
4–5 Sage leaves, minced
1/2 C Pork and Poultry Seasoning
1/3 C Honey, melted
1 C Butter (2 sticks), separated and room temp
For Brine
⅓ C Salt
2T Brown Sugar
1T Pepper
For Injection
⅓ C Honey
⅓ C butter, melted
⅓ C White Wine, separated
½ C Turkey broth, separated
For Gravy
2 Yellow Onions, quartered
6 Celery Stalks, rough chopped
3 Leek stalks, rough chopped
5 Garlic Cloves
5 Carrots, rough chopped
½ Bundle Thyme
4C Turkey Broth (I use better than bullion)
½ C White wine
½ C White Grape Juice
S&P to taste
For Pan Liquid to be added to gravy pan in equal parts every hour
1C Turkey Broth
1C White wine
1C White Grape Juice
For Roux
4T Butter
6T Flour
Instructions
First things first. The Brine. This needs to be done the morning of. Brining a turkey is imperative to the overall outcome of the turkeys texture and flavor, HOWEVER, a wet brine in an ice chest full of sugar and saltwater is NOT. (Nothing against this kind of brine, but a dry brine is easier, faster, and takes up less space.
Be sure you’ve properly and fully defrosted your turkey. Remove the giblets and set aside. Rinse and dry the entire thing thoroughly with a paper towel. Place the Turkey breast side down on a rimmed baking sheet, and with a very sharp pair of kitchen shears remove the spine. Combine the salt, Sugar, and black pepper, and cover the whole outside AND underside of your bird. Keep on your countertop for up to 1 ½ hours. If this makes you squeamish, just place it in your refrigerator uncovered. (Keep in mind that the closer to room temp your turkey is when you cook it, the easier it will be to inject and the more even it will cook) Feel free to take this time to prep your veggies for the gravy or start dessert!
After Brining for 1 ½ – 2 hours rinse your turkey in cool water and pat dry with paper towels. Use a gloved hand to very carefully separate the skin from the meat on the breasts and legs to create “pockets”. Pull the skin away in a small section, then start with your fingers, and slowly separate the skin from the meat until you can easily fit your entire hand under the skin to the bottom of the bird. Repeat on the other side and legs.
Combine all the ingredients for the injection in a tall glass. This will make it easier to handle with the syringe. Inject the mixture directly into the meat going UNDER THE SKIN in 3-4 places per leg and 5-6 places per breast until you’ve used all of the mixture. Don’t puncture the skin.
Combine ½ C room temp butter, sage leaves, and thyme. After patting turkey as dry as you can with paper towels, place the herb butter into the pockets you made under the skin.Spread evenly. ( Put about 2-3T per breast and leg then you can spread the butter out by pressing on the outside of the skin once it’s in)
Use the other ½ C room temp Butter to COVER the outside of the skin, making sure to cover the wings and bottom of the legs. Sprinkle the rub liberally over both sides of the turkey. Set aside.
In a large foil roasting pan (big enough to span the length and width of the base of the turkey) place the prepared giblets, turkey spine, yellow onions, carrots, garlic, celery, leek, and sprinkle with the Thyme. Place the foil pan with the Veggies UNDER the grates in your smoker. Replace the grates over the top of the foil pan and bend the sides if its a bit too tall. Pour the 4C Turkey Broth, ½ C White wine, and ½ C White Grape Juice over the veggies. *This pan should never be lower than 1/2 way full of liquid. As turkey cooks and liquid evaporates, add more of the prepared pan liquid.(1C wine,1C juice, and 1C chicken stock). About every hour add some to the veggie pan.
Set smoker to “smoke” with the lid open for about 5 minutes to establish flame. Close lid and preheat to (425F)
Place the Turkey, breast side up, directly on the grates and squarely over the foil pan. Lower the temp to (350F) and cook for 2.5 hours or until internal temp reads (135F). It should be browned and have decently crisp skin at this point. *This pan should never be lower than 1/3 way full of liquid. as turkey cooks and liquid evaporates, add more of the wine, juice, and chicken stock. About every hour add to it.
Melt the ⅓ C Honey and brush it LIBERALLY over the turkey. Add any remaining liquid to the drip pan and cook and additional half hour, or until the internal Temp hits (160F) with an instant read thermometer.
Carefully remove the turkey from the smoker and place in rimmed baking sheet and tent with foil. It will be Very golden, very crispy on the outside, and super juicy on the inside. Let rest while you make the gravy.
Remove the foil pan from the smoker and strain the liquid into a clear measuring cup. Use a ladle to remove as much of the fat layer as you can. You should have about 5 Cups of liquid.
In a saucepan over medium-high heat combine the 4T butter and the 6T Four to make a roux. Stir the mix until fragrant and golden. Slowly add the pan liquid while whisking the mixture to avoid lumps. Once all the liquid is incorporated turn the heat to medium and simmer stirring often until it reaches desired thickness.
Share
Skillet Chicken and potatoes with lemon, rosemary, and honey glaze
If everything can “taste like chicken”, make your chicken taste freaking amazing. I make a ton of chicken at my house, and I can honestly say that this is one of my favorite recipes. (My 3 year old eats this like a champ!) You can make it using things you probably already have, so its perfect for a last minute dish.
Scale
Ingredients
1 Small fryer chicken, skin on and spatchcocked (spine removed)
10 Large Red potatoes, sliced into thick “fries”
1/2 Red onion, sliced into cubes
2 Lemons, sliced into wedges
1/2 cup (1 stick) Butter, room temp
1/2 cup White Grape juice
1/2 cup Chicken Stock
3 cloves Garlic, minced
1 Packet Onion Soup Mix
1 t Flake salt
1/3 t Pepper
1/4 cup Honey
4 Springs rosemary, fresh
2 T EVOO
Nonstick spray
Instructions
Preheat your smoker to (425F) (I used Cherry wood) * You CAN do this in your oven, but its better on the grill
Spritz the bottom of your pan with nonstick spray. Combine the prepared potatoes, onions, garlic,1/3 of the onion soup packet, and olive oil in the base of your Cast iron skillet. Make a space in the middle for the spatchcocked chicken. Your pan needs to be big enough to have the veggies not be TOO stacked on top of each other. If you don’t have a giant skillet, you can use a sheet pan!
After spatchcocking your chicken, very carefully use your fingers to separate the skin from the meat in the beasts and thighs to create “pockets”. Pat very dry with a paper towel.
Spread butter on top of the meat under the skin on the breast and thighs, and on TOP of the skin of the rest of the bird. Use 1/3 of the butter under the skin and the rest over the skin. Sprinkle the rest of the onion soup packet over the entire surface (the bottom and top)
Place the chicken in the center of the skillet with the veggies then sprinkle the whole thing with the pepper and half of the salt. Place on the lowest rack of your preheated smoker.
After about 20 minutes or when the potatoes on the edges and base have started to turn golden, add the grape juice and chicken stock to the pan. Be careful not to pour the liquid OVER the chicken.
Cook for an additional 30 minutes or until the internal temp reaches (155F). Drizzle the honey over the chicken (and a little over the potatoes if you want to get crazy) and cook for an additional 4-5 minutes or an internal temp of (165F). If you need more liquid, add it at any point.
Remove the skillet from the grill and sprinkle the rest of the flake salt over the top of the chicken.
* If you want the pan sauce to serve separately, just remove the chicken from the pan and strain the remaining veggies and sauce with a sieve. Place the potatoes and onions back into the base of the pan, top with the chicken, and serve the sauce in a gravy boat.
The chicken turns out beautifully and the flavor is SO SO good. Enjoy!
Share
Smoked Chicken Wedge Salad with Sweet Green peppercorn-Cholula Dressing
A few weeks ago my husband celebrated his birthday by going on a fishing trip with some buddies. When they took a break for lunch they decided to grill up some hot dogs (I know, why not fish? lol) It was in this moment that my husband first tried Cholula® Hot Sauce on a hot dog.
He came home raving about it and has been on a Cholula kick ever since. It’s been really fun to experiment with the different flavors (did you know there are 6? My favorite is Cholula Green Pepper) I’ve been able to add it to so many different dishes to really take flavors to the next level.
I’m a big fan of salads in general and am particularly fond of wedge salad, it’s just so pretty and put together. My husband appreciates salads too, but only if a very decent amount of meat is involved. Thus the wedge salad accompanied by a full chicken leg was born.
I used the Cholula Original flavor to add a savory kick to the chicken and the Cholula Green Pepper flavor in the salad dressing to round out the flavor composition of sweet, savory, citrus, and pepper. We’ve had this dish about 5 times in the last month and I don’t see an end in sight!
Scale
Ingredients
4 Chicken Legs. skin on
1/2 Cup Butter, room temp
1T Cholula Original
S&P to taste
6 Slices cooked bacon, rough chopped
1 Head Butter Lettuce, Quartered
16 Garlic cloves, roasted
4 Small Roma Tomatoes, sliced
1/2 Cup Shaved Parm
Dressing:
2 Cloves Roasted Garlic
1T Shallot
2t White wine Vinegar
1/2C Buttermilk
1/3C Mayo
1t Grainy Dijon Mustard
1t Italian Pepper
1t Cholula Green Pepper
1t Honey
Instructions
Dressing:
Combine all ingredients in a food processor until well combined. Refrigerate for up to one week.
Salad:
Preheat smoker to (375F). While the grill is preheating, use a paper towel to pat the chicken legs as dry as you can. Use a gloved hand to create a pocket between the skin and the meat of the chicken legs.
Combine the butter and Cholula Original. Use your hand to place about 1T of the butter mixture evenly under the skin of each of the legs. Spread another Tablespoon of the butter over the top of the legs being sure to cover both sides. Sprinkle with Salt and pepper to taste.
Place the chicken legs directly on the grill. Cook for about 30 minutes, or until you get an internal temperature of (165F) with an instant read thermometer.
Place each chicken leg in the center of a plate. Center the wedge of lettuce in the crook of each leg and garnish with the tomatoes, roasted garlic, and bacon. Drizzle with the Sweet Green Peppercorn-Cholula dressing and garnish with the Parm slices.


