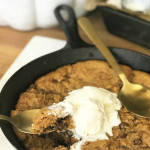
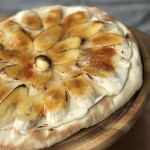
I grew up in California going to a pizza restaurant called BJ’s. They have a fabulous dessert called a “pizookie” or Pizza-Cookie. I wanted to try my hand at making one on the smoker, and as its October, the Pumpkin Chocolate Chip ensued.
Scale
Ingredients
1/2C Butter
1/4C Granulated Sugar
3/4C Brown sugar
1/3C Canned Pumpkin
1 Egg Yolk
1t Vanilla
1t Cinnamon
1/2t Pumpkin Pie seasoning
1t Baking Soda
1/2t Salt
1.5C Flour
1C milk chocolate chips
Instructions
1. Melt Butter, and combine with sugars. Add egg yolk, Pumpkin, and vanilla and mix until combined.
2. Whisk Dry ingredients. Add to wet and stir until well combined. Stir in chocolate chips.
3. Cover, and refrigerate for a minimum of 1 hour. (it works great if you store it overnight!)
4. Set Smoker to “smoke” with the lid open 5 minutes. Close lid and turn up the heat to (350F)
5. Place cold dough into a 9in cast iron (or two 4in cast irons)
6. Smoke for 15 minutes or until the edges are browned and the middle is cooked through.
7. Serve HOT with a scoop of Vanilla Ice cream.
Share
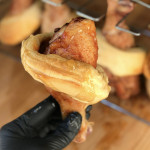
Smoked Chicken Legs wrapped in a Biscuit and drizzled with Apricot Ale Jam
Have you ever had those crackers, “chikin in a biskit”? I have fond memories of those crackers being a favorite snack in my youth. So when I saw them in the grocery store a few weeks ago, obviously I had to buy some for my toddler. I decided that although these crackers were great for my son, I needed to make some chicken in a biscuit for my finer adult tastes. Thus, Smoked chicken legs wrapped in Biscuits came about. (thank goodness)
Scale
Ingredients
8 Chicken Legs
1 Can Pillsbury Flaky Biscuits
1/3C Apricot Ale Jam ( I used Pot Licker)
3T EVOO
2–4T Traeger Chicken Seasoning (depending on tatste)
Instructions
Set smoker to “smoke” with the lid open for 5 minutes. Close Lid.
While smoker preheats, toss the chicken legs in the oil and cover in the seasoning.
Hang on your chicken rack, and “smoke” for 30 Minutes.
Turn the heat up to (300F) and cook the wing for 20-25 minutes.
While Legs are cooking, remove the biscuits from canister, and using a very small biscuit cutter or thimble, remove the center. (you can use your hand for this and just rip a hole in it if you need to, but smaller is better! otherwise the biscuit will slide off as it cooks.
Remove the chicken rack from the smoker and, one by one place the biscuits over the chicken.
Place the Chicken rack back into the smoker for about 15 minutes. Until the biscuits are golden, and the internal temp of the chicken is at least (165F)
Keep chicken biscuits inverted until ready to serve. Melt jam in the microwave for about 45 seconds until runny. drizzle over chicken and serve!
Easy as pie.
Share
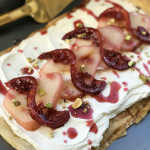
Poached Pear and Sweet Goat Cheese Tart on Phyllo Dough with Lemon and Pistachio
Gorgeous when plated. The flavors are AH-MAZ-ING together, and everyone you make it for will love it. Seriously. Make it.
Scale
Ingredients
1 Pkg frozen Phyllo dough, thawed (you’ll only need about 8 sheets)
4T Butter, melted
1–3 pears, firm (depending on how many you want on top)
1 Lemon, sliced thin
1 bottle Mikes hard lemonade
1bottle mikes hard cherry lemonade
1/2C water
4oz Goat cheese
2C Heavy whipping Cream
1/2C + 3T Granulated Sugar
9 Pistashios, crushed
Instructions
1. Combine the Lemonades, water, and 1/2C sugar in a deep pot. Bring to a boil for 1 minute. Turn down to a simmer. Add the sliced lemons.
2. Peel the pears leaving the stem, and cut the bottoms so they stand flat. place them in the poaching liquid until they are cooked, but still firm. about 15 minutes. Turning them occasionally to be sure they are evenly cooked and covered. ( you can lay them on their side if you need to) Remove carefully and place them on wax paper to cool.
3.leave the lemon slices in the poaching liquid and keep at a simmer on the stove an additional 15 minutes. ( or until the syrup is thickened, and the lemon sliced and translucent and rinds are a dark pink.) then place lemons on cooling rack to dry and harden slightly.
4. Pour 1/2 of the heavy Cream, and 3T Sugar into an electric mixer and whip until soft peaks form. Add the goat cheese, and other half of the cream and mix until all the chunks are gone and you have a dense smooth cream. (about 5 minutes)
5. Preheat oven to (350F) then line a cookie sheet with parchment.
6. VERY carefully lay one sheet of Phyllo dough on the parchment. Brush with butter, and add another sheet. Continue until all 8+ sheets are used. * if you need more butter, melt more butter*
7. Bake for about 15-20 minutes, until the phyllo is golden and puffy. Let cool.
8. While the Phyllo crust cools, slice the cooled pears into thin slices, lengthwise. (Use a melon baller to remove the hard centers and seeds if you want your tart seed free) the Tart is pretty big, and you cant go wrong with more pears. Serve any slices you don’t use on your tart on the side. They’re delicious by themselves!
9. CAREFULLY Spread the cream mixture onto the phyllo, leaving a crust. Decorate the top of the tart wit the pears and lemon slices, then sprinkle the pistachios. Drizzle with poaching liquid right before serving.
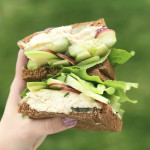
I HATE CHICKEN SALAD. like, a lot. Mostly because mayonnaise is the absolute grossest thing on the planet. But I was once asked to bring some to a party, I so figured, rather than ski the party, I may as well make some that was actually good.
Enjoy!
Scale
Ingredients
3C Smoked, Shredded Chicken Breast
6 oz Cream Cheese, slightly softened
2 Medium sized Green Apples, 1 peeled & grated. The other cut into thin slices
1/2 Cucumber, sliced thin
15–20 Large Red Grapes, sliced thin
4 Leaves Butter Lettuce
Lemon zest of 1 lemon
S&P to taste
8 slices Dark Rye Bread
Instructions
Combine the Chicken and Cream Cheese. Stir it until there are NO cream cheese chunks. You want it smooth. Add the shredded apple, lemon zest, and about 3/4 of the grapes. season with salt and pepper. ( I like a little more pepper in this recipe!) Stir to combine.
On 4 slices of bread, layer a hefty amount of the chicken mix, then a layer of sliced grapes, apples, then cucumber and lettuce. Serve immediately! * This is also an amazing compliment to crackers *Adding candied walnuts to this recipe is also super good!
This recipe was inspired by Wolfgang Pucks Chicken pot pie recipe. I really loved the idea of puff pastry as a top as apposed to traditional pie Crust. What really makes this dish though is the glaze on top! Really takes it to that next level.
Scale
Ingredients
2 Lb Shredded Smoked Chicken
3T Flour Divided
3T Vegetable oil, divided
4T Butter
2 Russet Potatoes, peeled and cubed
1C Carrot, chopped
1C Cellery, chopped
1 medium onion, diced
3 Garlic Cloves, minced
1 Bunch Fresh Thyme
1C Amber Ale
2C + 1/3C Chicken Stock
1C + 1T Heavy Whipping Cream, divided
1C Frozen Peas
1Pkg Frozen Puff Pastry
1 Egg
3T Smoked honey
Instructions
Toss the chicken in 2T flour, and brown in a large skillet with 2T oil. Remove from pan and set aside.
In the same Skillet, on medium heat, add the last Tablespoon oil, 2T butter and Onions. Cook for about 5-6 minutes until onions are caramelized. Add potatoes, carrots, and celery and cook for about 3 minutes until shiny and fragrant. Stir in garlic, and the leaves of 2 thyme springs. Sautee and additional 2 minutes.
Add the amber ale, and turn the heat to high. Scrape the bottom of the pot while you stir to remove any caramelized pieces. Simmer about 3 minutes. Add the 2C chicken stock and 1C heavy cream. Bring to a boil and reduce by half. (YES HALF)
Stir in the chicken and peas. Salt and Pepper GENEROUSLY. Mash the 2T butter with 1T flour and stir that into the mixture.
Roll out the puff pastry using a floured surface. Cut rounds slightly larger than the tops of the ramekins, so the pastry will hang over the sides slightly.
Ladle chicken mixture into individual ramekins and cover in the puff pastry rounds.
Mix the egg with 1T heavy cream and brush it onto the tops of the puff pastry. Use a knife to cut 4 “vents” into the tops.
Preheat oven to (400F) and place the ramekins onto a cookie sheet. Cook for 30 minutes or until the crusts are a deep brown.
While the pies cook, combine Honey, 5-6 Thyme sprigs, and 1/3C chicken Stock in a small saucepan on medium heat. Reduce the sauce to about 2/3.
After removing the pot pies form the oven, brush each one with the honey thyme glaze. Let cool about 10 minutes before serving, so glaze can set. Garnish with thyme springs.
Share
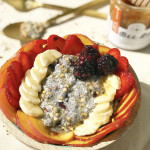
Vanilla Chai Pudding, with Fresh Fruit and Smoked Honey
This is the easiest, prettiest breakfast there is! It takes about 15 minutes, is super filling, full of fiber and you can easily make it for a crowd.
Scale
Ingredients
4T Chai Seeds
8T Vanilla Almond Milk
1/2 Peach, sliced thin
3 Strawberries, sliced thin
1/2 Banana, sliced thin
3–4 Blackberries
6 Pistachios, crushed
Instructions
Stir the chai seeds and the Almond Milk in a small bowl. Let sit about 10 minutes until the chai seeds absorb the milk and create a pudding like texture.
Arrange sliced fruit on top of the pudding.
Sprinkle with Pistachios, and drizzle with Honey. Serves 2.
Enjoy! (seriously that’s all there is to it.) Booya.
Share
Puff Pastry Squares, dipped in Smoked Syrup Glaze and Bacon
They say, necessity breads genius. That is exactly what happened with these. I didn’t have refrigerator biscuits, enter Puff Pastry. I didn’t have Maple flavoring, enter smoked simple syrup.
Genius as born, and it only took about 20 minutes! Pretty much these are fancy donuts. But who can say “no” to puff pastry?
Scale
Ingredients
1 Can Crescent SHEET, rolled out and cut into 8*( you can use the frozen puff pastry or crescent rolls too, but I like the sheet better for this)
1 lb Bacon, cooked and rough chopped
2–3C Vegetable oil for frying
1C Smoked Syrup Glaze
Glaze
1/4C Butter
1/2C Brown Sugar
3T Milk
1T Light Corn Syrup
1T Traeger Smoked Simple Syrup
2C powdered Sugar
Instructions
Heat oil in a medium sized pot. allow the oil to heat until you can drop a test piece of dough in and it starts to bubble and float.
Fry Pastry squares 2-3 at a time. About 2 minutes on the first side, flip, and about 1 minute on the other.
Remove from the oil and Set on a paper towel to cool.
While the Donuts cool, make glaze. (Recipe Below)
Dip the front of the squares into the glaze, and top with bacon. Serve warm.
Use any extra glaze to drizzle over the top. Or eat with a spoon. Either way.
Glaze
Melt the butter and sugar together in a small saucepan until they’re combined and the sugar is dissolved.
Add the milk and stir constantly for about 2 minutes.
Remove from heat and add the corn syrup, and simple syrup.
Slowly whisk the powdered sugar in the mix about 1/3 C at a time. If you want a thinner glaze, add more simple syrup. If you want it thicker, add more powdered sugar.
Share
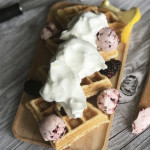
Lemon Curd Waffles with Salted Blackberry Butter, and Lemon infused Meringue
Lemon is my jam. I love pretty much all things lemon, pretty much all the time. If it has Lemon Curd in it, its probably one of my favorite foods. I use store- bought lemon curd for this, but you could 100% make your own. Lets be honest, its always a good thing to have hanging around.
But I mixed it right into the batter for these waffles, and the effect is amazing. Just enough lemon flavor to make it purposeful, but not overwhelming. I also really love this recipe because there is NO need for syrup! HELLO salted blackberry butter!
Scale
Ingredients
For Waffles
2 Eggs
2C Flour
1 3/4C Heavy Cream
1/2C Vegetable Oil
1T Granulated Sugar
4t Baking Powder
1/3C Lemon Curd
For Salted Blackberry Butter
1/2C Unsalted butter, softened
4 5 Blackberries, diced
1/2t Flake salt ( I like Jacobsens Co.) + more for garnish
For Lemon Infused Meringue
4 Egg whites, room temp
1/2C Water
1C Sugar
Juice from 1 lemon
Zest from 1/2 Lemon
Instructions
Combine all the dry ingredients in one medium sized bowl. Add the wet ingredients, and stir until just combined.
Spray a waffle iron with PAM or nonstick spray, and cook until golden. This recipe should make about 6 full sized waffles.
Top each with the salted blackberry butter while they’re still hot, and finish with hefty scoops of the meringue. You can add syrup if you want, but I really don’t think it needs it!
For Salted Blackberry Butter
Combine all ingredients in a small bowl, and refrigerate for about 10 minutes. Scoop it into small rounds using a small scoop, and top each one with a pinch of salt. Keep them refrigerated until ready to serve on HOT waffle.
For Lemon Infused Meringue
In a saucepan, combine the water, sugar, and lemon zest. Cook the sugar syrup until it hits (240F)
While your sugar syrup is heating, whip up the egg whites and the lemon juice in your mixer until soft peaks form.
VERY slowly add the sugar syrup to the egg whites while the mixer is running on medium. After all the sugar is added, turn the mixer up to high and mix until you have stiff peaks. The meringue should be shiny and have a super silky texture.
There you have it! A perfect breakfast dish for mothers day, a birthday, or just Tuesday. Happy cooking!
Share
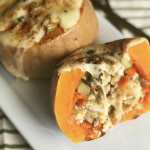
Roasted Squash with caramelized Leeks, Onions, Garlic, and Turkey
Fall means cool nights, and warm meals. Roasted squash and aromatic veggies are the perfect Fall meal. Its filing, tasty, and super impressive looking.
Scale
Ingredients
4 Banana Squash bases, cleaned and trimmed
2 Lbs Ground Turkey
6T EVOO
2T Butter
3 Large Leeks, diced
1 Medium sized zucchini, diced
3 Medium Carrots, diced
1 Small Yellow Onion, diced
3 Garlic cloves, minced
8 Slices Muenster Cheese
S&P to taste
1/2C Chicken Stock
1T Parsley
Instructions
Set smoker to “smoke” with the lid open about 5 minutes.
Turn the heat up to (400F) (you can totally do this in your oven too)
While the smoker preheats, brush each squash with evoo and a generous amount of S&P
Place the Squash on a baking sheet and smoke them for about 35 minutes, until golden, and tender when pierced with a fork.
While the squash is cooking, brown Turkey in a deep pot. Drain, and set aside.
In the same pan heat 2T oil, and 2T Butter. Cook the leeks, onions, and carrots about 10 minutes, until aromatic and the onions are transparent. Add the chicken Stock.
Add the zucchini, garlic, turkey, and S&P and cook an additional 2-3 minutes.
Fill each Squash 1/2 way full. Layer a sliced cheese, and fill the rest of the way. Cover with more cheese. Can you ever have enough cheese?
Cook until cheese is just melted ( you could use a broiler for this too)
Remove from onion and sprinkle with parsley.
Serve right away!
Share
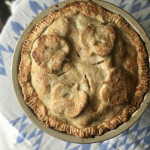
Smoked Apple, Candied Bacon, and Cheddar Pie with Cheddar Crust
I once had dinner at a food truck that sold only grilled cheese sandwiches. Genius right? I got one called the “ABC” . It had apples, cheddar, and bacon. It was amazing. So the inspiration for this pie came from that little food truck I went to 5 years ago. I added about 20 more ingredients, and candied the bacon, but you get the idea.
I make this one for dessert, but you could easily make it for breakfast for a crowd. OR desert for 2, save the leftovers, and breakfast for 2 the next morning! win. win.
Scale
Ingredients
For Dough
2.5C AP Flour
1T Sugar
1C Salted Butter, cubed
1C Sharp Cheddar cheese, grated
1/2C Ice Water
For Filling
5 Green Apples
1 lemon, juiced
1/2C Brown Sugar
3T Cornstarch
1/2t Cinnamon
1/2C Cheddar cheese
1 Package bacon, cooked and candied **** To Candy Bacon ( Cut bacon into 1in squares, cook till mostly done in a deep pan, drain. Add 1/3C granulated Sugar. Stir until dissolved and bacon is shiny and coated. Spread on wax paper to cool)
Instructions
For Dough
In a large bowl, stir together the four, and sugar.
Add the butter. Use a pastry cutter to combine the sugar and the butter to resemble a thick mealy texture. ( if you dont have a pastry cutter you can use your hands, or a food processor)
Add the cheese, and mix with your hands to combine.
Add the Water. Mix until *just* incorporated and turn out onto floured surface. Knead the dough a few times until combined. Separate it in half ( one slightly bigger than the other) Wrap them in plastic wrap, and refrigerate at least 30 minutes.
For Filling
Peel and slice the apples, then toss them in the lemon juice to keep them from browning.
In a separate bowl, stir together the Brown sugar, Corn starch, and Cinnamon. Add this mixture to the apples.
Set your smoker to “smoke” with the lid open for about 5 minutes to establish a flame. Turn it up to (350F) with the lid closed.
While your smoker preheats, assemble your pie.
Roll the larger of the 2 doughs out to about 1/4in and place it in a 9in pan.
Layer half of the apples, bacon, cheese, then the other half of the apples.
Roll out the other half of the dough to 1/4in and cover the apples. Trim the top layer so its smaller than the bottom layer. Flip the excess of the bottom layer on top of the top layer and pinch the edges together with a fork.
Vent the top with a pairing knife, and brush with egg wash then sprinkle with Turbinado sugar
Smoke the pie for about 35 min or until the crust is golden brown.
I’m very embarrassed to admit this, BUT I worked at a Pizza restaurant while I was in culinary school. Pizza was not what I had imagined for myself, as a chef. However, one good thing came out of the pizza place! This recipe was derived from a pizza we made there, and it was rally quite good.
Scale
Ingredients
1 Pizza dough (enough for a 10in Crust)
2 Large Bananas
1/4C Granulated sugar
2T Corn Meal
For Vanilla bean Cream cheese frosting
8oz Cream cheese, room temp
1/2C heavy cream
1C powdered sugar
1t Vanilla
1 Vanilla bean. bean removed
Instructions
Set Smoker to “smoke” with the lid open for about 5 minutes.
Turn the hear to (450F) with the pizza stone inside.
While the smoker is preheating, roll out your dough to about 10 inches and place on a Corn mal covered cutting board. Poke several times with a fork.
Transfer the pizza crust to the Pizza stone by sliding it along the corn meal. Cook for about 8-10 min until your crust is golden.
While you cut cools, slice your bananas very thin, in a diagonal pattern to make ovals.
After your pizza is *mostly* cool, cover it in the Vanilla bean frosting, and arrange the banana slices.
Sprinkle the sugar evenly over the bananas and use a butane torch to brulee ( or caramelize) the sugar.
Serves 2-4
For Vanilla bean Cream cheese frosting
In an Electric mixer beat the cream cheese until light and fluffy. Add the heavy cream, vanilla, and vanilla bean and mix until well incorporated.
Slowly combine the Powdered sugar. ( adding more or using less depending on desired consistency)
I LOVED creating this dish! Its been on repeat all week lol Treager sent me a bottle of the bloody mary mix, and honestly, the possibilities are endless. It paired super well with shrimp though, and by adding some fresh carrots, apple, and cabbage to the taco, it really rounded out the flavor of a bloody mary taco!
Its summery and fresh and very pretty. Not to mention great paired with a bloody mary!
Serves 4 (or 2 if you’re really hungry)
Scale
Ingredients
24 Shrimp, shelled and deveined
1C Traeger Bloody Mary Mix
8 Corn Tortillas
3T Butter
1 Lemon, quartered
1T Bloody Mary salt mix (I used Traeger)
1/2 Green Apple, grated
1 Large Carrot, grated
1/4C Chopped Cabbage
1 Small Bunch chopped Cilantro
Instructions
Combine the shrimp and the Bloody Mary mix and Marinate for at least 4 hours.
Set smoker to “smoke” with the lid open to establish fire. Then clos the lid and set to (400F)
While the smoker is preheating, put the shrimp onto kebabs, set aside.
Melt 1/3 of the butter in a large pan and fry 2-3 tortillas at a time, flipping after about 5 minutes. Repeat until all the tortillas are golden and crisp o the outside. (add more butter as needed) Set them on a rolling pin while you’re waiting to fill them to help them take that “taco” shape.
Cook the shrimp for about 7-8 minutes flipping halfway through. Don’t overcook! layer, apples, cabbage, and carrots into the tortilla, followed by 3 shrimp per taco and then toss some cilantro on each one. Finish by squeezing the lemon onto each of the tacos, and serve.
I promise, you will love these tacos, they have SO much flavor, you really don’t need anymore seasoning or salsa. Enjoy!


