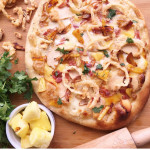
White BBQ Chicken Pizza with garlic chips and homemade onion straws
Description
BEST.PIZZA.EVER. My husband is a lover of pizza, so I test pizza recipes out more often than id like to admit. (BTW brussels sprouts on pizza is not wonderful..) BUT this recipe is pure perfection guys. It has smoked chicken, Gouda, fresh mozzarella, bacon, caramelized pineapple, garlic chips, and onion straws.
Ingredients
-
6oz Favorite pizza dough ( I just buy the premade yeast dough at Harmons)
-
2T cornmeal
-
3/4C shredded chicken
-
1/3C favorite BBQ sauce
-
4oz thick sliced mozzarella
-
3oz (about 5 slices) smoked gouda
-
4 slices cooked bacon chopped
-
1/3C pineapple (sautéed in 1t honey)
-
2 garlic chips ( 2 cloves sliced thin and sautéed in 1/2t evoo till crisp and golden)
-
1/2C onion straws
-
1T cilantro chopped
Onion Straws
-
1 yellow onion slices SUPER thin (a mandolin works well for this)
-
2C flour
-
1C buttermilk
-
1/2C whole milk
-
1T salt
-
1/4t paprika
-
1/4t garlic powder
-
1/4t onion powder
-
pinch black pepper
-
3C frying oil heat to about (375F)
Instructions
*Set the smoker to smoke with the lid open (4-5 minutes until the fire is established) then set the temperature to high (450F) and preheat with the lid closed. Place your pizza stone ( or if you’re ghetto like me an inverted cookie sheet) on the grate while the traeger preheats.
- Roll the dough out on a floured surface until its about 10 inches in diameter. Let it rest. (geeze)
- Spread the cornmeal on the back of a cutting board and place the dough on top of the cornmeal.
- Top that dough! Sauce first, cheese, chicken, bacon, pineapple and a little more cheese. And maybe more cheese after that just for good measure.
- Slide the pizza off of the cutting board and onto the cookie sheet in one sliding, swooping motion. (“swooping motion” may or may not be a made up phrase…)
- Let the pizza cook with the lid closed for about 10-15 minutes or until golden brown and remove from oven using the same swooping motion.
- While still hot, top the pizza with the garlic chips, onion straws and cilantro. If you hate cilantro I’m pretty sure you and I will never be friends, because cilantro is MAGIC! But, you could substitute it with green onions I suppose.. if you HAVE to.
Onion Straws
- Separate the onions so that you don’t have a bunch of chunks.
- Dredge them in the buttermilk, then toss thoroughly in the flour mixture
- Place the onions about 1/3 at a time into the oil and fry until golden brown.
- Place on a plate lined with paper towel until ready to top the pizza!
* make sure your oil is HOT enough or you’ll have a doughy/oniony nasty mess in the bottom of your pan. Or so I’ve been told. As a professional I clearly wouldn’t know anything about that…
I think its safe to say that pizza almost always goes with rootbeer, so pair those two up, serve, and enjoy!


