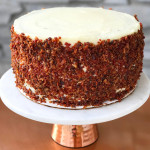
Red Velvet Cake with Cream Cheese Frosting and Bacon Sprinkles
Print
Print

Print
Red Velvet Cake
Description
This recipe may very well be the reason why my husband married me. I made it for him our very first valentines day together, and after that he was smitten. I’ve had people ask me why I would put bacon on a cake, and all I can say to that is, “If you have to ask why I would put bacon on cake, we cant be friends.” Trust me guys, this one is GREAT.
Scale
Ingredients
- 1 Box Red Velvet Cake Mix
- 1 Pack chocolate pudding mix
- 3 eggs
- 1 1/4 C Milk
- 2/3 C melted butter, cooled
Instructions
- Mix all ingredients and bake as per direction on the box.
- Let cool completely.
I KNOW. I used a box mix so obviously I’m a fraud. If you have a red velvet recipe you love, by all means, use it. But honestly guys, if you use a box mix as a base, and add your own real, good ingredients, you cant even tell the difference! ( In most cases)
Cream Cheese Frosting
Scale
Ingredients
- 1C Salted Butter, softened
- 16oz Cream Cheese, softened
- 6C Powdered sugar
- 4t vanilla extract
Instructions
- Mix the cream cheese and butter together until well blended and you cant see any chunks. Stir in the Vanilla, then slowly add the powdered sugar. If you want your frosting thicker, add more powdered sugar, if you need it thinner, add milk.
- Personally I like this frosting THICK because it has to be able to hold a TON of bacon sprinkles without sliding down the side of the cake. ( A bacon slide sounds fabulous BTW)
- Start by adding about 1/4in (or more) of frosting on top of the first layer. Sprinkle a layer of bacon sprinkles. Stack the second layer on top. Scoop a HEAPING cup of frosting on top of the second layer and spread across the top, and down the edges. Continue with more frosting until the entire cake is covered and all sides are even.
Bacon Sprinkles
Scale
Ingredients
- 2 Packages bacon
- 1/2C Granulated sugar
Instructions
- Cut all the bacon into quarters and fry in a heavy bottomed pan. Drain fat if you need to so that the bacon cooks evenly.
- Set all the bacon on a paper towel to drain as much of the bacon grease as possible. Once cool, rough chop the bacon.
- Use the same pan, and pour the sugar into the bottom on medium heat. Cover with cooked bacon, and STIR continuously. You want all the bacon covered, and you REALLY don’t want to burn that sugar. This will take about 5 minutes.
- Once the sugar is melted and the bacon is all covered, pour it all out onto wax paper and let cool.
- Put all the candied bacon into a food processor and blend until it looks like little pebbles ( or sprinkles!) Don’t over-blend, or you’ll end up with bacon jam instead of bacon sprinkles.
- Cover all sides of your cake with the sprinkles starting at the bottom, and working your way up to the top. These are AMAZING so you’ll want to cover pretty much every possible spot on your cake. Save the leftovers (provided you have any) for garnishing slices or ice cream.
- Refrigerate 1 hour before serving for the perfect consistency. Be the frickin’ champion of the party.
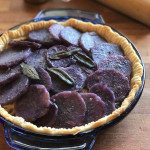
Purple Potato, Brown Butter and Sage Pie
Print
Purple Potato, Brown Butter and Sage Pie
Description
This recipe was totally a gamble that definitely paid off! My sister has a giant incredible garden, so while I was visiting her I wanted to use as many of the amazing veggies in her garden as possible. Enter purple freakin’ potatoes. We dug them up then cooked them within about 1 hour. It was amazing. Its too bad I couldn’t even keep a chia pet alive let alone keep a garden.
Scale
Ingredients
- 2 Medium sized purple potatoes, boiled
- 2 Medium Yukon potatoes, boiled
- 1 Pie crust, par baked
- 10 Sage leaves ( 5 chopped, 5 whole)
- 2 large eggs
- 1/2C Whole Milk
- 1/2C Heavy Cream
- 2T Butter
- S&P to taste
Instructions
- Boil the potatoes, let cool completely, and slice thin. I didn’t peel mine, but you can if you feel so inclined
- Put the butter and whole sage leaves into a shallow saucepan. Brown the 2 T of butter and remove the full leaves. Set the leaves on a paper towel.
- Par Bake your pie crust. ( I just used a premade crust, but a homemade crust would be amazing too!) The crust should hold its form but not be browned at all on the edges.
- Whisk eggs, Milk, chopped Sage, S&P, and Heavy Cream. Set aside
- Line the pie crust with the Yukon potatoes, pour the Egg mixture over the top. Layer the purple potatoes over the top. Pour the browned butter over the purple potatoes and S&P.
- Bake at (375F) for 25-30min or until the cream is set. If the edges of the crust are browning too quickly, tent them with foil. Let cool slightly before serving.
- Garnish with crispy sage leaves.
- We had this for dinner, but it would be amazing as a brunch dish also!
- Line the pie crust with the Yukon potatoes, pour the Egg mixture over the top. Layer the purple potatoes over the top. Pour the browned butter over the purple potatoes and S&P.
3 Cheese Farfalle n’ Cheese
Print
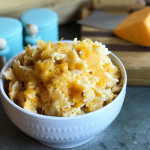
3 Cheese Farfalle n’ Cheese
Description
Mac n’ Cheese gets a little adult makeover with this 3 cheese Farfalle. That’s not to say that your kids wont want this too! Trust me, you wont have leftovers.
Scale
Ingredients
- 3 Cups cooked Farfalle Pasta
- 4T Butter
- 4T Flour
- 1.5 Cups Whole milk
- 1 Cup half and half
- 1 Cup Havarti cheese
- 1 Cup Gouda cheese
- 1 Cup Cheddar cheese
- 1 T Grainy mustard
- 1t Dijon mustard
- S&P to taste
Instructions
- Cook the pasta until al dente. Set aside.
- In a medium saucepan melt the butter and add the four. Stir until thickened and browned.
- Add the milk and half n half and the S&P. ( I like mine super peppery!)
- Cook about 6-7 minutes until thick and bubbling. Add both mustards and all cheeses, and stir, stir, stir!
- The sauce will be thick and cheesy and creamy and amazing. Stir in the pasta. Transfer to a baking dish and top with more cheddar. Broil until meted and bubbling.
- You’re welcome world.
Streak Wrapped Asparagus
Print
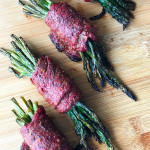
Streak Wrapped Asparagus
Description
This dish takes no time at all, but looks like you worked all day to make something extra fancy! The flavor is amazing and it’s SO pretty. Is there a better way to get your veggies in than by wrapping them in meat? I say no.
Scale
Ingredients
- 2 Bunches Asparagus
- 6 Slices top round steak. (about 12 in by 2 in ea.)
- 1T seasoning (I used sundown rubs and seasonings, beef flavor)
- 2T EVOO
- 1/2t Honey
- S&P to taste
Instructions
- Toss the asparagus in 1T EVOO and sprinkle in S&P. Line a baking sheet with foil and Roast in the oven at (400F) about 10 minutes until par-baked. Remove from oven and let cool. (If you’re using really thin slices of asparagus you could probably skip this step and just wrap them directly in the meat)
- While asparagus is baking turn the smoker to the smoke setting for about 5 minutes until the fire is established. Turn to high.
- Brush the meat with 1T EVOO and honey, then sprinkle generously with seasoning. Wrap the meat tight around about 7 pieces of asparagus. No need to secure 😉 Place the asparagus bundles directly on the grate about 10 minutes on one side, and 2-3 minutes on the other.
- Serve right off the grill. Look like a PRO.
Peaches and Cream German Pancakes with Cinnamon Candied Almonds
Print
Print

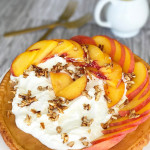
Peaches and Cream German Pancakes
Description
I got this recipe from my roommate/cousin, who got it from her mom, who apparently got it from my mom. SO, it went through a lot to get to me, but it’s tried and true and the perfect breakfast to feed a crowd. Plus if you actually have any, leftovers reheat fabulously.
Scale
Ingredients
- 2 T Butter
- 6 Eggs
- 1C Flour
- 1C Milk
- 1/2t Salt
- 1/2t Almond extract
- 1C fresh whipped cream
- 1 Peach, sliced thin
- 1/2C Candied cinnamon almonds
Instructions
- Put butter in the base of a cast iron pan or a 9×13. Put the pan in the oven and preheat it to (450F)
- Blend the Eggs, Flour, Milk, Salt, and almond extract.
- When the oven is preheated, pour the mixture into the pan and cook for 15 minutes. Fill it with whipped cream, peaches, and top with the candied almonds. That’s it. SO easy.
Cinnamon Candied Almonds
Scale
Ingredients
- 1/2C Chopped Almonds
- 3T Granulated Sugar
- 1/2t cinnamon
Instructions
- Place the sugar, nuts, and cinnamon in a small sauce pan and stir it until the sugar is melted and the nuts are well coated.
- Immediately pour the nuts out in a single layer on wax paper and let cool.
You could really top a German pancake with any fruit, cream, or syrup. I would definitely add syrup though because the pancakes don’t have any sugar. I used my homemade vanilla bean syrup. (The recipe is on my Instagram if you want it!) The pancake will be very sense and a perfect base. ENJOY!
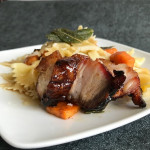
Smoked Pork Belly with Sweet Potato and Farfalle Pasta, topped with Browned Butter-Sage sauce
Print
Print
Smoked Pork Belly
Description
If you’ve never tried pork belly, DO IT. Its magical on its own, but takes truly anything to the next level when added to another dish.. Its super versatile and OH SO MUCH MORE than just “bacon steak.” For this dish, I paired it with a light pasta and mildly sweet brown butter sauce. ( again, browned butter is also SO much more than just a sauce) but that’s neither here, nor there.
Scale
Ingredients
Pork Belly & Rub
-
2 lb Pork belly
-
4 T EVOO
-
1/2C Brown Sugar
-
1/2C White Sugar
-
1/2T Smoked Paprika
-
1T Season Salt (I like Johnny’s seasoning)
Instructions
- Set smoker to “smoke” with the lid open, and allow the fire to get established. After about 5 min turn to (250F)
- Cut the belly in half lengthwise then Score each fat cap in a criss cross pattern. Don’t cut through the meat.
- Rub each in EVOO and 3/4 of the rub. Put them directly on the grill and cook for 2 hours
- Turn up the heat to (350F) . Remove the slices from the smoker and set on a piece of foil. Sprinkle the rest of the rub and cover completely. Cook or an additional 30 minutes.
- Remove from heat and let rest about 5 minutes before slicing.
- We both know that you’re going to have to sample a slice, just try to save some for whoever you’re making dinner for.
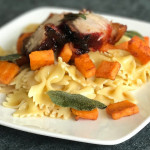
Sweet Potato Farfalle pasta with Brown Butter and Sage
Scale
Ingredients
- 2C Farfalle Pasta
- 1 Sweet potato, cubed, and steamed
- 3T Butter
- 5–6 Sage leaves
- 2t EVOO
Instructions
- Cook the pasta to al dente. I have found that cooking pasta in salted water for about 7 minutes is almost always perfect! Toss the pasta with 1t of evoo just so it doesn’t stick together.
- Sauté the sweet potato cubes in about 1t of EVOO until they look browned and are soft. Sprinkle the cubes over the pasta.
- Put sage leaves in the hot pan and 3T of butter over the top. Swirl the butter in the pan until it browns and becomes fragrant. ( Browned butter smells like happiness incarnate). Pour the butter over the pasta and sweet potatoes. Top with a couple slices of pork belly. Automatically feel better about your life.
This meal SLAYS! Its incredibly visually pleasing , and tastes every bit as good as it looks.
Smoked Bacon Bombs
Print
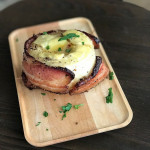
Smoked Bacon Bombs
Description
I use onions A LOT in my recipes. They just work for so many different things. Sadly, I married an onion hater, or more specifically, an “if I can tell there are onions in it I don’t like it” hater. So I’ve gotten pretty good at disguising the onions I so often use. Thankfully, there is no need with this recipe! Yes, Onions are the main and pretty much only ingredient, BUT they are sweet, smokey, and packed with so much amazing cheese and bacon flavor, that onions are about to become your favorite vegetable.
Scale
Ingredients
- 3 Sweet Yellow Onions
- 1C Beef Stock
- 1/4C whiskey
- 4T Motreal Seasoning
- 2T EVOO
- 5oz Sliced Gruyere cheese
- 1T parsley, chopped
- 6 Slices of pepper crusted bacon
Instructions
- Cut the tops and bottoms off of each onion so that they can stand up on their own.
- Use a spoon to hollow out a “well” in each onion. You’ll be removing several of the inner layers. Do NOT scoop out to the bottom!! You have to have a cheese basin. (are there any 2 words that sound better together?)
- Wrap 2 slices of bacon around each onion and secure them with toothpicks.
- Brush each wrapped onion with EVOO and rub with 3T of the montreal seasoning
- Combine beef stock, whiskey, and 1T montreal seasoning. Fill each onion 2/3 of the way full. Reserve the rest for basting. Be sure to baste onions every 10 minutes while they smoke!
- Set smoker to smoke with the lid open until the fire is well established. Turn to (250F) and smoke the onions for 1 hour and 30 minutes.
- Turn the heat up to (400F) and fill the onions with cheese, (spread some across the top too, why not?) cook for an additional 15 minutes. Remove from the grill and serve immediately.
I served these alongside tri tip and they were a serious HIT! I would plan on about 1/2 an onion per person. Not to mention my husband says the leftovers are even better the next day, so there’s that to look forward to too! You’re welcome in advance.
Lemon-Poppy Seed Banana Bread with a Lemon Cream Glaze and Candied Lemon Rings
Print
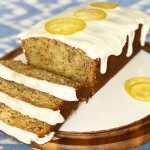
Lemon-Poppy Seed Banana Bread with a Lemon Cream Glaze and Candied Lemon Rings
Description
If you have a toddler/ pet monkey you probably understand the struggle that is buying bananas every other day. Sometimes (all the time) I over shop and buy too many bananas, so I have a plethora of banana recipes and bread variations. Banana Bread is kind of the chicken of the baking world. You can mix it with almost anything and it takes on the flavors of what you pair it with. I love this recipe because its so stinkin’ easy. I’ve used this Sour cream banana bread recipe for years, and change it up depending on what I’m feeling I want to mix in. (Its great on its own too, if you’re a plain chicken kind of girl. Or guy.)
Scale
Ingredients
Lemon Poppy Seed Banana Bread
- 1/2C Room temperature butter
- 2 Eggs
- 1/2C Brown Sugar
- 1/2C Granulated Sugar
- 3 Ripe Bananas, mashed
- 1T Poppy seeds
- 1T fresh lemon juice
- Zest from 1/2 Lemon
- 1t Baking Soda
- 1/2C Sour Cream
- 2C AP Flour
- 1/2t Vanilla
Lemon Cream Glaze
-
1C Powdered Sugar ( I recommend sifting it but its not 100% necessary)
-
3T heavy whipping cream
-
1T fresh lemon juice
Candied Lemon Rings
-
1/2 lemon sliced THIN
-
1C water
-
3/4C Granulated sugar
Instructions
Lemon Poppy Seed Banana Bread
*Preheat oven to (350F) and grease your loaf pan
- Cream butter and sugars until light and fluffy.
- Mix in eggs until well incorporated
- Add the remainder of the ingredients and stir until combined
- Pour batter into prepared pan and cook for 45 minutes. Cover in foil and cook for an additional 15 minutes.
- Let your loaf cool completely before pouring the glaze or its going to melt right off and look super ugly.
Lemon Cream Glaze
- Combine all ingredients, and pour over your loaf. Add more powdered sugar if you want it thicker, and add cream if you want it thinner. Seriously that’s all there is to it. Spread it with the back of a spoon for a more even look.
Candied Lemon Rings
- Simmer the cup of water in a wide pot
- Dissolve sugar in water and add the lemon slices in one layer
- Keep the lemons simmering in the water until they’re translucent and the water is syrupy. (about 30 minutes)
- Using tongs, transfer the lemon slices to wax paper and allow to cool completely before topping loaf
These lemons really take this banana loaf over the top. I love these on deserts! You can use this same technique to candy oranges, limes, and grapefruit! The possibilities are endless.
Honeycomb Vanilla-Bean Ice Cream
Print

Honeycomb Vanilla-Bean Ice Cream
Description
Ice cream is obviously incredible so we don’t have to harp on that. THIS ice cream is incredible because it is the easiest desert ever to make. EVER. Minus the honeycomb part… I definitely had to make that twice because I thought I could “eyeball” when sugar had got to 300F. Rookie mistake.
Scale
Ingredients
Ice Cream
-
2C Heavy whipping Cream
-
1 Can Sweetened Condensed Milk
-
1 Vanilla Bean
-
1/2 C crushed Honeycomb Candy and some for topping
Honeycomb Candy
- 1 3/4C Sugar
- 1/3C Honey
- 1/4C water
- 1T Baking Soda
- 1C melting chocolate
Instructions
Ice Cream
- Make honeycomb candy. Set aside. Don’t worry, I’ll get to that recipe in a bit.
- Whipped heavy Cream until it forms stiff peaks.
- Cut the vanilla bean longwise down the center. Use the sharp side of a knife to scrape all the beans out. Add them to the cream and mix until just combined.
- Gently fold in the can of sweetened condensed milk.
- Pour 1/4 of the cream mix into a loaf pan. layer 1/3 of the crushed honeycomb. Repeat until you’ve use all the cream and all the honeycomb.
- Top with larger crumbles and freeze at least 4 hours.
- *This is best when made the same day that you’re going to serve it.*
Honeycomb Candy
- Mix all the ingredients except the baking soda and chocolate together in a deep pot.
- Heat on medium heat until the sugar/honey/water mix starts to boil
- Let the mix continue to boil until it reaches (300F) Use a candy thermometer and definitely don’t try to “eyeball” it. THIS WILL TAKE LONGER THAN YOU THINK IT WILL. trust me . Don’t rush it or you can expect the wrath of the candy-making Gods.
- Once it hits (300F) remove it from the heat and whisk in the baking soda. Its going to get SUPER foamy so whisk, whisk, whisk!
- Pour the mixture on a silpat lined cookie sheet. Don’t flatten or stir it after pouring it. Where you pour it is where its going to stay.
- Let it cool completely before breaking it into pieces
- Melt the chocolate and dip some of the pieces. Let the cool on wax paper and use as a garnish for your ice cream.
I served my ice cream over brownies. I’d probably serve my BBQ sauce over brownies. Brownies are great. But the ice cream would be great on its own or on top of a sugar cookie.
Blackened Pork Chops served with Cherry-Artichoke Brown Rice
Print
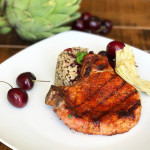
Blackened Pork Chops served with Cherry-Artichoke Brown Rice
Description
Pork chops are just plain phenomenal when smoked. That’s all there is to it. Although pork chops tend to be more of a rarity around here, I always serve them with a fun side. They actually pair quite well fruit most fruits, which adds another level of creativity to making a side. Meat served with a savory fruit side you say? Bring it on.
Scale
Ingredients
Blackened Pork Chops
- 2 bone in pork chops
- 2T Blackened seasoning
Cherry/Artichoke Brown Rice
- 1 cup brown rice
- 1/4C quinoa
- 2C beef, chicken, or vegetable stock
- 3 cherries, diced
- 2 artichoke hearts, diced
- 1t unsalted butter
- 1T yellow onion, minced
Instructions
- Turn the smoker to smoke with the lid open and allow the fire to get establish for 5 minutes
- Crank up the heat to 450F and close the lid
- Cover the chops in the blackening seasoning and place directly on the grates. close the lid and allow to cook until it has an internal temp of 150F (about 30 minutes)
- Remove from the smoker, and let rest about 10 minutes before serving
Cherry/Artichoke Brown Rice
- Combine rice/quinoa/stock and prepare either on stovetop, or if you want your life to get infinitely easier, a rice cooker. Set aside **PRO TIP** I ALWAYS make rice using stock. Water is SO 5 years ago. ALWAYS
- Melt butter in the bottom of a pan on medium heat. Add onion and sauté for 1-2 minutes.
- Add the cherries and artichoke to the pan and heat through. Combine with the rice, and serve under the blackened chops.
- This dish has flavor on flavor going on. Its perfect for weekday dinners and makes for awesome leftovers!
Perfectly Smoked New York Strip Steak with blackberry peppercorn compound butter
Print
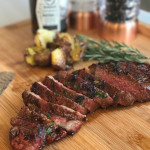
Perfectly Smoked New York Strip Steak with blackberry peppercorn compound butter
Description
I am a meat eater. I love a steak probably 20X more than the average person. (unless your name is “Bubba”, you live in Louisiana, and you say the word “gator” at least 3 times a day, then we might be tied. You are obviously a kindred spirit)
Every year on my birthday I’d ask my mom to make me steak. Even when I didn’t know it was called steak, I asked for steak. I just knew I loved it, and New York strip is one of my favorites.
This. This is the steak recipe you never knew that you always wanted. Its the perfect cut for valentines day, an anniversary, or a random Tuesday. (seriously my husband IS the luckiest. just sayin’)
Scale
Ingredients
- 2 6-8oz new York strip steaks
- 2T evoo
- 2T Favorite rub (nothing too peppery or too sweet!)
- 2T brown sugar
Compound Butter
- 1 Blackberry mashed
- 1/4 C unsalted butter at room temp
- 1t peppercorns
- 1t chopped parsley
- pinch salt
Instructions
* make the compound butter first while letting the steaks sit out at room temp before smoking
- Set your traeger to smoke with the door open for about 5 minutes. After the fire is established turn it up to high (450F) and close the lid while it preheats.
- Slather those steaks in evoo then the rub and brown sugar mix. The sugar is important in this recipe to really make a perfectly caramelized crust!
- Cook at (450F) for 30 minutes or until it has an internal temperature of (140F)
- Remove from heat, cover in foil, and let it rest for like ten minutes (resting is SO key to getting a juicy steak!!)
- When you’re ready to serve, place a medallion of the compound butter on top of your steaks and let it drip down the sides. (sorry, that almost sounds dirty.)
Compound Butter
- Combine all the ingredients until just incorporated. Don’t overmix or it’ll just be an ugly purple mess.
- Splat the butter onto a square of wax paper and roll it up tight like a burrito. It should look like a little log. Set it in the refrigerator for a least 30 minutes until its firm and you can slice it into pretty medallions
There you have it! A Fancy pants meal that takes all of 30 minutes to cook. I served this one up with some garlic and rosemary smashed potatoes. I bet you anything Bubba’s showing off with this one right now. I’d be impressed.
