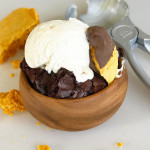
Honeycomb Vanilla-Bean Ice Cream
Description
Ice cream is obviously incredible so we don’t have to harp on that. THIS ice cream is incredible because it is the easiest desert ever to make. EVER. Minus the honeycomb part… I definitely had to make that twice because I thought I could “eyeball” when sugar had got to 300F. Rookie mistake.
Scale
Ingredients
Ice Cream
-
2C Heavy whipping Cream
-
1 Can Sweetened Condensed Milk
-
1 Vanilla Bean
-
1/2 C crushed Honeycomb Candy and some for topping
Honeycomb Candy
- 1 3/4C Sugar
- 1/3C Honey
- 1/4C water
- 1T Baking Soda
- 1C melting chocolate
Instructions
Ice Cream
- Make honeycomb candy. Set aside. Don’t worry, I’ll get to that recipe in a bit.
- Whipped heavy Cream until it forms stiff peaks.
- Cut the vanilla bean longwise down the center. Use the sharp side of a knife to scrape all the beans out. Add them to the cream and mix until just combined.
- Gently fold in the can of sweetened condensed milk.
- Pour 1/4 of the cream mix into a loaf pan. layer 1/3 of the crushed honeycomb. Repeat until you’ve use all the cream and all the honeycomb.
- Top with larger crumbles and freeze at least 4 hours.
- *This is best when made the same day that you’re going to serve it.*
Honeycomb Candy
- Mix all the ingredients except the baking soda and chocolate together in a deep pot.
- Heat on medium heat until the sugar/honey/water mix starts to boil
- Let the mix continue to boil until it reaches (300F) Use a candy thermometer and definitely don’t try to “eyeball” it. THIS WILL TAKE LONGER THAN YOU THINK IT WILL. trust me . Don’t rush it or you can expect the wrath of the candy-making Gods.
- Once it hits (300F) remove it from the heat and whisk in the baking soda. Its going to get SUPER foamy so whisk, whisk, whisk!
- Pour the mixture on a silpat lined cookie sheet. Don’t flatten or stir it after pouring it. Where you pour it is where its going to stay.
- Let it cool completely before breaking it into pieces
- Melt the chocolate and dip some of the pieces. Let the cool on wax paper and use as a garnish for your ice cream.
I served my ice cream over brownies. I’d probably serve my BBQ sauce over brownies. Brownies are great. But the ice cream would be great on its own or on top of a sugar cookie.
